


-
AUDIO VIDEO PROCESSING, SETUP & ENVIRONMENTOfficial REW (Room EQ Wizard) Support Forum Audiolense User Forum Calibration Equipment Auto-EQ Platforms / Immersive Audio Codecs Video Display Technologies / Calibration AV System Setup and Support Listening Room / Home Theater Build Projects Room Acoustics and Treatments AV Showcase Movies / Music / TV / Streaming
-
AUDIO VIDEO DISCUSSION / EQUIPMENTHome Theater / Audio and Video - Misc Topics AV Equipment Advice and Pricing Awesome Deals and Budget AV Equipment AV Receivers / Processors / Amps UHD / Blu-ray / CD Players / Streaming Devices Two Channel Hi-Fi Equipment DIY Audio Projects Computer Systems - HTPC / Gaming HD and UHD Flat Screen Displays Projectors and Projection Screens AV Accessories Buy - Sell - Trade
You are using an out of date browser. It may not display this or other websites correctly.
You should upgrade or use an alternative browser.
You should upgrade or use an alternative browser.

John Mulcahy
REW Author
- Joined
- Apr 3, 2017
- Messages
- 7,403
You can do a substitution calibration, making a measurement with each mic in turn from exactly the same position (usually best close to a source) and then using the All SPL trace arithmetic A/B to calculate the ratio of the responses. Probably best using magnitude-only data for the ratio, which you can make from the measurements by selecting each in turn (with no other measurement selected) and using the "Average the responses" button which will produce a magnitude-only copy. The UMIK-1 measurement needs to use the UMIK-1 cal file. Levels should be manually aligned to match at 1 kHz.
Sergejs
New Member
- Joined
- Sep 2, 2022
- Messages
- 7
More
- DAC
- Apple USB-C dongle
- Front Speakers
- KH120A
- Center Channel Speaker
- Studio 520c
- Surround Speakers
- Control One
You can do a substitution calibration, making a measurement with each mic in turn from exactly the same position (usually best close to a source) and then using the All SPL trace arithmetic A/B to calculate the ratio of the responses. Probably best using magnitude-only data for the ratio, which you can make from the measurements by selecting each in turn (with no other measurement selected) and using the "Average the responses" button which will produce a magnitude-only copy. The UMIK-1 measurement needs to use the UMIK-1 cal file. Levels should be manually aligned to match at 1 kHz.
This is a very useful overall answer to get started! Exactly what I looked for to check/improve calibration on the miniDSP UMIK-X which comes with just generic calibration file and can-not be calibrated "professionally" at all.
But due to my limited competence, could I ask for some more details? Specifically:
- Since v5.20.13 there are new trace arithmetic features which may be even better for microphone calibration? Yes/no/maybe? (sorry, as new user I am not allowed to post links to release notes)
- I assume that it is a good idea to average multiple measurements instead of just using one take, but which averaging method is most suitable? There are "dB" / "Vector" / "RMS" Average buttons available? (some searching gave me paper "The Geometric Mean is a Superior Frequency Response Averaging Method for Human Body Vibration" on ResearchGate, which unfortunately did not make me any smarter...)
- Windowing should be used to filter out reflections? Any tips to make sure that windowing is included in trace arithmetic?
- Finally a new calibration file probably needs some smoothing applied, as well as it needs some reasonable amount of data points in the text-file. Is that handled by REW somehow or should be done in other software? I can only think of writing a Python script, but that again involves many arbitrary decisions which may or may not be optimal (trying to "do it right"...).
- In addition I would appreciate some links to extra reading or more detailed explanation of trace arithmetics. I failed to find some resource that explains the notation and practical meaning behind "A/B", "1/A", "A-B", etc.
I hope in time someone will write a full step-by-step tutorial for microphone calibration. I could not find any reliable and detailed microphone calibration tutorials on the Internet (there are some, but quite basic level only). This is a very important topic for many enthusiasts and professionals alike, for example:
- To make/check 90deg calibration file for Earthworks mics which normally only have free-field calibration files.
- To make calibration files for high quality non-measurement microphones, for example to use DPA 4060 for acoustic measurements (FIY, when calibrated, DPA 4060 capsules are used in Brüel & Kjær Type 4101-B).
- To check relative calibrations between different measurement microphones.
- To improve calibration of UMIK-X and other mics that do not have reliable individual calibrations.
Thank you very much for the excellent software and all the education!
John Mulcahy
REW Author
- Joined
- Apr 3, 2017
- Messages
- 7,403
The regularisation option for division would help avoid issues due to dips in the reference response, but they are best minimised through the measurement setup and windowing.Since v5.20.13 there are new trace arithmetic features which may be even better for microphone calibration? Yes/no/maybe?
RMS average is probably best.I assume that it is a good idea to average multiple measurements instead of just using one take, but which averaging method is most suitable? There are "dB" / "Vector" / "RMS" Average buttons available? (some searching gave me paper "The Geometric Mean is a Superior Frequency Response Averaging Method for Human Body Vibration" on ResearchGate, which unfortunately did not make me any smarter...)
Trace arithmetic is done using the windowed responses, so just make sure the windows are as you wish them to be set before doing the arithmetic. You can see the effect of window changes interactively on the Impulse graph by dragging the window indicators at the top of the graph, only the right hand window is relevant. There is a button on the IR windows dialog to apply window settings to all measurements.Windowing should be used to filter out reflections? Any tips to make sure that windowing is included in trace arithmetic?
REW has plenty of smoothing options.Finally a new calibration file probably needs some smoothing applied, as well as it needs some reasonable amount of data points in the text-file. Is that handled by REW somehow or should be done in other software? I can only think of writing a Python script, but that again involves many arbitrary decisions which may or may not be optimal (trying to "do it right"...).
There isn't a lot to explain, it is just like ordinary arithmetic except it is carried out point by point on the complex frequency response.In addition I would appreciate some links to extra reading or more detailed explanation of trace arithmetics. I failed to find some resource that explains the notation and practical meaning behind "A/B", "1/A", "A-B", etc
ddude003
AV Addict
More
- Preamp, Processor or Receiver
- PrimaLuna Dialogue Premium TubePre (2 channel+sub)
- Main Amp
- McIntosh MC152 SS Amp (2 channel)
- Additional Amp
- Yamaha RX-A850 Pro (the other 5 channels lol)
- Computer Audio
- MacBook Pro, Custom i7 7700k De-lid 2xAsus1080ti GFX, Audirvana Studio, Hang Loose Convolver, Tone Projects Michelangelo, Pulsar Massive & 8200, LiquidSonics, SoX
- DAC
- Chord Electronics Ltd. Qutest
- Universal / Blu-ray / CD Player
- Sony UBP-X700 /M Ultra HD 4K HDR & PS5
- Front Speakers
- Martin Logan ElectroMotion ESL
- Center Channel Speaker
- Martin Logan Motion C2
- Surround Speakers
- Martin Logan Motion 4
- Surround Back Speakers
- Martin Logan Motion 4 (yes, another set of these)
- Subwoofers
- Martin Logan Dynamo 700
- Other Speakers or Equipment
- Cifte 12AU7 NOS & Genalex Gold Lion Tubes in Pre
- Video Display Device
- Samsung The Premiere LSP7T UST Laser Projector
- Screen
- Elite Screens Aeon CLR3 0.8 Gain 103-inch
- Remote Control
- PrimaLuna, Lumin iApp, Samsung & Yamaha
- Streaming Equipment
- Netgear Nighthawk S8000 Streaming Switch, Lumin U1 Mini Streamer Transport
- Streaming Subscriptions
- QoBuz Studio Premier, Amazon Prime & Netflix
- Other Equipment
- ThrowRug, SaddleBlankets, WideBand & Bass Traps...
Google is your frenemy... https://www.roomeqwizard.com/help/help_en-GB/html/graph_allspl.html... Description of Trace Arithmetic and caveats of usage are a few sections down...5. In addition I would appreciate some links to extra reading or more detailed explanation of trace arithmetics. I failed to find some resource that explains the notation and practical meaning behind "A/B", "1/A", "A-B", etc.
Sergejs
New Member
- Joined
- Sep 2, 2022
- Messages
- 7
More
- DAC
- Apple USB-C dongle
- Front Speakers
- KH120A
- Center Channel Speaker
- Studio 520c
- Surround Speakers
- Control One
The regularisation option for division would help avoid issues ...
Thank you! I will have to write up a draft of the process / tutorial based on all of this. There seems to always be one more thing to take into account
")
Sergejs
New Member
- Joined
- Sep 2, 2022
- Messages
- 7
More
- DAC
- Apple USB-C dongle
- Front Speakers
- KH120A
- Center Channel Speaker
- Studio 520c
- Surround Speakers
- Control One
So... expanding on the John's response, Here is my draft procedure for microphone calibration:
Objective: to verify and improve calibration of one measurement microphone against another, reference microphone.
The concept: we find the OFFSET correction from the measurement with OLD calibration file to the REFerence microphone measurement. Then we apply the offset to the old calibration file to get the NEW calibration file. (this way low-bass calibration and gain can be re-used from the original file in case it was not possible to reliably re-calibrate those parameters in your setup).
Steps:
I hope we can have a discussion and peer-review on this draft. I am trying to fix mistakes in this tutorial for myself and others.
In my testing, UMIK2 had more than 2dB error at high frequencies compared to Earthworks M23R reference (and I am quite confident in accuracy of my measurement setup and of the M23R). So this sort of calibration is quite significant in practice for people who use affordable USB microphones.
Objective: to verify and improve calibration of one measurement microphone against another, reference microphone.
The concept: we find the OFFSET correction from the measurement with OLD calibration file to the REFerence microphone measurement. Then we apply the offset to the old calibration file to get the NEW calibration file. (this way low-bass calibration and gain can be re-used from the original file in case it was not possible to reliably re-calibrate those parameters in your setup).
Steps:
- Record speaker measurements with both REFerence microphones and microphone that needs to be re-calibrated - "DUT" - device under test..
- Use substitution of microphones in front of the same speaker. Every microphone is placed as-precisely-as-possible (precision within a couple of millimeters) in the same spot, one at a time. (A lot of people ignore this and place microphones even several centimeters off from one another which is a Bad idea)
- Speaker should be physically small, coaxial or a "full-range" driver. It does not need to be flat, just needs to have enough output at all relevant frequencies to give enough dynamic range versus ambient noise and microphone self-noise. Alternatively, the calibration will only be valid at frequencies that speaker can reproduce (it is rare to get a speaker with good lower bass output that is otherwise compact and full-range).
- Use typical Measurement Sweep at 48 or 44.1 kHz (perhaps using longer sweep length 512K or if possible, a few repetitions).
- Check the maximum THD distortion in the measurement. Consider to not use frequencies with > 3-5% THD. (If distortion is high - either the speaker is pushed too loud or the speaker can not produce enough output to overcome ambient noise - typical at low frequencies).
- + other optimizations to reduce impact of reflected sound, avoid comb-filtering from multiple drivers playing the same frequencies, leave enough distance for sound of multiple drivers to integrate, as well as keep direction of direct sound as close to point-source as possible.
- (optional?) apply "IR Windows" to all measurements. (Recommendations not clear at the moment, but to-start-with try frequency dependent window with 15 cycles, Tukey 0.25)
- Apply light smoothing on the data, for example 1/48. (The smoothing and windowing will be used in the Trace arithmetic.)
- Alternatively, the smoothing may be redundant if you already applied "IR Windows".
- Apply OLD calibration file to the DUT measurement data. (Note that it is possible to add or replace microphone calibrations for each measurement at any point. Also, you may have applied the calibration already when you selected microphone for measurement in REW Preferences).
- Run "Average The Responses" (the same as "RMS Average") on the DUT data. (To both bake-in the old calibration file and remove phase information in the DUT data).
- Do the same procedure for the REFerence data: apply any calibration files and then take "RMS Average" of the REFerence microphone data. (To both bake-in the calibration file and remove phase information. Note, if you can, take an average of multiple reference microphones - no microphone is perfect, so average of several top-quality microphones is better than any single one of them.)
- Use "Align SPL..." on the averages of DUT and REF.
- If you are calibrating miniDSP UMIK then "Align SPL" to 0db at 1 kHz with 0 or 1 octave span (because UMIK calibration files are always 0dB at 1000 Hz).
- For other cases, choose alignment parameters that make the most sense (usually using midrange frequencies within 250 to 2000 Hz, because at high frequencies reflections make the data less consistent between microphones).
- Use "Trace arithmetic" ==> "A/B" where you divide: averaged DUT data / REFerence data. As a result you get the "OFFSET correction".
- Load in the OLD calibration file as a measurement (using File => Import frequency response).
- Apply 1/3 (or 1/6) smoothing on the "OFFSET correction" to make it about as detailed as the OLD calibration curve. (The smoothing will be used in the Trace arithmetic.)
- Use "Trace arithmetic" ==> "A*B" where you multiply: smoothed OFFSET correction * OLD calibration file. As a result you get the initial "NEW calibration". (Note, the input data has no phase and there is no need to do SPL alignment before multiplication).
- Manually align SPL of the NEW calibration by going to "Measurement actions" and dialing in "SPL offset" value to match OLD calibration and press "Add Offset to data". Alignment is done at a frequency where you plan to join the OLD and NEW calibration data together (a reasonable value could be 1 kHz, depending on the speaker size, room reflections and differences between old and new calibration curves).
- Note: to make the manual alignment easier: first use "Align SPL..." function to 0 dB. and then do the manual "SPL offset" in fully zoomed in view.
- Export NEW calibration as text with 48PPO and NO-additional smoothing (smoothing should already be sufficient from previous operations).
- Check that you get the values all the way to 20 kHz. If not, simply export one more text file with "Use measurement resolution" setting and copy the last row out of this "high-resolution" file into your normal 48PPO text file. (You can also round the frequency to "20000.0")
- Splice the data: copy the relevant frequency-SPL rows from the exported NEW calibration text file into the original OLD calibration text file using basic text editor. This way only valid values are replaced (for example low-bass calibration and gain can stay from the original file).
- Done.
I hope we can have a discussion and peer-review on this draft. I am trying to fix mistakes in this tutorial for myself and others.
In my testing, UMIK2 had more than 2dB error at high frequencies compared to Earthworks M23R reference (and I am quite confident in accuracy of my measurement setup and of the M23R). So this sort of calibration is quite significant in practice for people who use affordable USB microphones.
Last edited:
PabloAguas
Registered
- Joined
- May 19, 2020
- Messages
- 8
More
- Preamp, Processor or Receiver
- SCHITT Gumby
- Main Amp
- Audio Note Kit 2
- Front Speakers
- AN
- Subwoofers
- ACI Titan
John Mulcahy
REW Author
- Joined
- Apr 3, 2017
- Messages
- 7,403
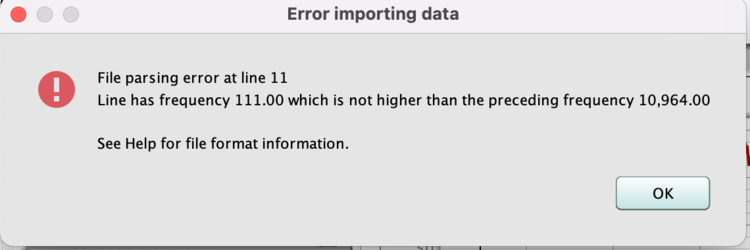
I can't reproduce that error. How was the file generated? It has some odd content, such as this section where there is a discontinuity and frequency goes down instead of up: The content below 20.6 Hz looks like it came from a different file and doesn't fit with the rest.
19.855 0.0371
20.102 0.0731
20.352 0.1076
20.605 0.1408
20.600000 -1.789
20.900000 -1.751
21.200001 -1.722
There is also a SENS FACTOR line which should only be used with calibrated USB mics such as UMIK-1 where REW knows the relationship between input volume setting and mic gain.
19.855 0.0371
20.102 0.0731
20.352 0.1076
20.605 0.1408
20.600000 -1.789
20.900000 -1.751
21.200001 -1.722
There is also a SENS FACTOR line which should only be used with calibrated USB mics such as UMIK-1 where REW knows the relationship between input volume setting and mic gain.
RMS average is probably best.
I which there was a "peak average", meaning that when averaging 2 or more measurements the higher peak would be preserved. I think this is an average method worth trying out since we percieve peaks better than dips
@Sergej
Sergej, that is fantastic - any chance that you could do a video tutorial for the rest of us?
So... expanding on the John's response, Here is my draft procedure for microphone calibration:
Objective: to verify and improve calibration of one measurement microphone against another, reference microphone.
The concept: we find the OFFSET correction from the measurement with OLD calibration file to the REFerence microphone measurement. Then we apply the offset to the old calibration file to get the NEW calibration file. (this way low-bass calibration and gain can be re-used from the original file in case it was not possible to reliably re-calibrate those parameters in your setup).
Steps:
- Record speaker measurements with both REFerence microphones and microphone that needs to be re-calibrated - "DUT" - device under test..
- Use substitution of microphones in front of the same speaker. Every microphone is placed as-precisely-as-possible (precision within a couple of millimeters) in the same spot, one at a time. (A lot of people ignore this and place microphones even several centimeters off from one another which is a Bad idea)
- Speaker should be physically small, coaxial or a "full-range" driver. It does not need to be flat, just needs to have enough output at all relevant frequencies to give enough dynamic range versus ambient noise and microphone self-noise. Alternatively, the calibration will only be valid at frequencies that speaker can reproduce (it is rare to get a speaker with good lower bass output that is otherwise compact and full-range).
- Use typical Measurement Sweep at 48 or 44.1 kHz (perhaps using longer sweep length 512K or if possible, a few repetitions).
- Check the maximum THD distortion in the measurement. Consider to not use frequencies with > 3-5% THD. (If distortion is high - either the speaker is pushed too loud or the speaker can not produce enough output to overcome ambient noise - typical at low frequencies).
- + other optimizations to reduce impact of reflected sound, avoid comb-filtering from multiple drivers playing the same frequencies, leave enough distance for sound of multiple drivers to integrate, as well as keep direction of direct sound as close to point-source as possible.
- (optional?) apply "IR Windows" to all measurements. (Recommendations not clear at the moment, but to-start-with try frequency dependent window with 15 cycles, Tukey 0.25)
- Apply light smoothing on the data, for example 1/48. (The smoothing and windowing will be used in the Trace arithmetic.)
- Alternatively, the smoothing may be redundant if you already applied "IR Windows".
- Apply OLD calibration file to the DUT measurement data. (Note that it is possible to add or replace microphone calibrations for each measurement at any point. Also, you may have applied the calibration already when you selected microphone for measurement in REW Preferences).
- Run "Average The Responses" (the same as "RMS Average") on the DUT data. (To both bake-in the old calibration file and remove phase information in the DUT data).
- Do the same procedure for the REFerence data: apply any calibration files and then take "RMS Average" of the REFerence microphone data. (To both bake-in the calibration file and remove phase information. Note, if you can, take an average of multiple reference microphones - no microphone is perfect, so average of several top-quality microphones is better than any single one of them.)
- Use "Align SPL..." on the averages of DUT and REF.
- If you are calibrating miniDSP UMIK then "Align SPL" to 0db at 1 kHz with 0 or 1 octave span (because UMIK calibration files are always 0dB at 1000 Hz).
- For other cases, choose alignment parameters that make the most sense (usually using midrange frequencies within 250 to 2000 Hz, because at high frequencies reflections make the data less consistent between microphones).
- Use "Trace arithmetic" ==> "A/B" where you divide: averaged DUT data / REFerence data. As a result you get the "OFFSET correction".
- Load in the OLD calibration file as a measurement (using File => Import frequency response).
- Apply 1/3 (or 1/6) smoothing on the "OFFSET correction" to make it about as detailed as the OLD calibration curve. (The smoothing will be used in the Trace arithmetic.)
- Use "Trace arithmetic" ==> "A*B" where you multiply: smoothed OFFSET correction * OLD calibration file. As a result you get the initial "NEW calibration". (Note, the input data has no phase and there is no need to do SPL alignment before multiplication).
- Manually align SPL of the NEW calibration by going to "Measurement actions" and dialing in "SPL offset" value to match OLD calibration and press "Add Offset to data". Alignment is done at a frequency where you plan to join the OLD and NEW calibration data together (a reasonable value could be 1 kHz, depending on the speaker size, room reflections and differences between old and new calibration curves).
- Note: to make the manual alignment easier: first use "Align SPL..." function to 0 dB. and then do the manual "SPL offset" in fully zoomed in view.
- Export NEW calibration as text with 48PPO and NO-additional smoothing (smoothing should already be sufficient from previous operations).
- Check that you get the values all the way to 20 kHz. If not, simply export one more text file with "Use measurement resolution" setting and copy the last row out of this "high-resolution" file into your normal 48PPO text file. (You can also round the frequency to "20000.0")
- Splice the data: copy the relevant frequency-SPL rows from the exported NEW calibration text file into the original OLD calibration text file using basic text editor. This way only valid values are replaced (for example low-bass calibration and gain can stay from the original file).
- Done.
I hope we can have a discussion and peer-review on this draft. I am trying to fix mistakes in this tutorial for myself and others.
In my testing, UMIK2 had more than 2dB error at high frequencies compared to Earthworks M23R reference (and I am quite confident in accuracy of my measurement setup and of the M23R). So this sort of calibration is quite significant in practice for people who use affordable USB microphones.
Sergej, that is fantastic - any chance that you could do a video tutorial for the rest of us?
Sergejs
New Member
- Joined
- Sep 2, 2022
- Messages
- 7
More
- DAC
- Apple USB-C dongle
- Front Speakers
- KH120A
- Center Channel Speaker
- Studio 520c
- Surround Speakers
- Control One
Hello, as there was not much response to expand on the tutorial in this forum, I posted a full, updated tutorial on a blog:@Sergej
Sergej, that is fantastic - any chance that you could do a video tutorial for the rest of us?

Microphone calibration tutorial - using REW
Detailed instructions for producing microphone calibration files from substitution measurements in widely popular, free REW acoustic measur...
 sergejs-on-sound.blogspot.com
I do not plant to make a video tutorial for this, but the illustrated tutorial should be easy to follow and is 100% how I did calibration for myself. Any comments or corrections still welcome. Note there are some mic calibration tutorials on YouTube that involve Phase calibration as well, but I haven't graduated to Phase calibration files - so decide for yourself


Popular tags
20th century fox
4k blu-ray
4k uhd
4k ultrahd
action
adventure
animated
animation
anime
bass
blu-ray
calibration
classic
comedy
comics
denon
dirac live
disney
dolby atmos
drama
fantasy
hdmi 2.1
horror
kaleidescape
klipsch
lionsgate
marantz
onkyo
paramount
pioneer
rew
romance
sci-fi
scream factory
shout factory
sony
stormaudio
subwoofer
superhero
svs
terror
thriller
uhd
ultrahd
ultrahd 4k
universal
value electronics
warner
warner brothers
well go usa