Automated Measurement Turntable Controlled by REW

Thread Starter
Joined
May 6, 2024
Messages
6
Hey everyone!

Just wanted to share a quick project I recently worked on: an automated loudspeaker measurement turntable controlled directly from REW (Room EQ Wizard).

I built this turntable to streamline my loudspeaker measurements and make the process more efficient. With REW's API-control (Beta release), I can precisely rotate the turntable to capture data at different angles, allowing for spinorama measurements without the need for manual adjustments. The setup has been a game-changer for me, saving time and ensuring accuracy in my measurements.

Here are some pictures with a small explainer:

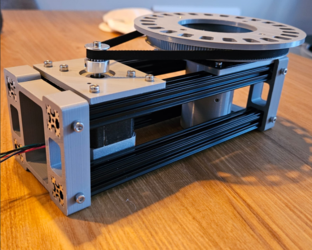
The table (made from the Audiomatica Medusa project files)
turntable.png

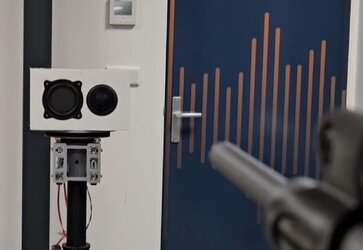
Table in action
in_action.jpg

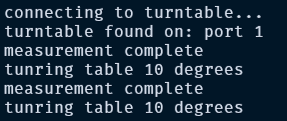
I wrote a custom controller that uses the REW-API (in beta release)
This is log from controller:
log.png

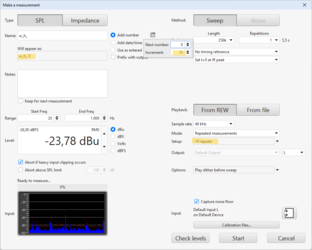
It uses the measurement 'Increment' number as rotational distance input for the turntable.
The 'Repeated measurement' feature in REW allows for automated repeat.
rew.png

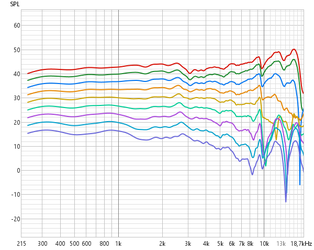
Example of 0 - 80 degrees measurement sequence (gated)
res.png

Happy to answer any questions or share more details if anyone's interested.
 
Last edited:

kevmoso

Registered
Joined
Oct 13, 2017
Messages
2
Very interested in this! More info please? Post your "custom controller" perhaps?
I didn't see printable files for the Audiomatica Medusa parts. Is this an Audiomatica members only thing? Not difficult to reproduce/improve in 3d but who doesn't like the easy button?
 

kevmoso

Registered
Joined
Oct 13, 2017
Messages
2
Also WTH kind of speaker did you measure with that nice of a polar response from 200 to 8-9khz?
 
Thread Starter
Joined
May 6, 2024
Messages
6
Very interested in this! More info please? Post your "custom controller" perhaps?
I didn't see printable files for the Audiomatica Medusa parts. Is this an Audiomatica members only thing? Not difficult to reproduce/improve in 3d but who doesn't like the easy button?
You have to subscribe (for free) on the medusa project page to download the files.

It is a great little project and thought it would be nice to have it integrated with REW.

I used a single motor driver and with an Arduino Nano, instead of a full CNC-shield. I thought the Gbrl-firmware to be too cumbersome for a simple rotation operation, so I wrote my own Arduino program that listens to serial commands.

The 'contoller' is a small executable (written in Go) that connects to the arduino and acts as a listener for REW-API subscription events. It takes care of converting a measurement event into a serial command for the turntable.
 
Thread Starter
Joined
May 6, 2024
Messages
6
Also WTH kind of speaker did you measure with that nice of a polar response from 200 to 8-9khz?
That is the Peerless TC7FD00-04 in a prototype. The project is a miniature three-way with listening window optimised performance.

Poster preview:
Screenshot_20240514_212608_Instagram.jpg


I was actually surprised by it's raw response.
 

unidisco

New Member
Joined
Aug 28, 2024
Messages
2
Really awesome project- your post inspired me to start the build on this turntable. Would you be open to sharing your work on the Arduino coding for other people to harness this measurement power? Thanks so much.
 

dcibel

Member
Joined
Sep 10, 2017
Messages
183
This looks like a great project! Unfortunately, the 3D printed turntable will be too small for most of my projects, but the concept and functionality with REW's API is definitely there.

Will you release your code to the public so others such as myself can learn from it? I've programmed plenty of building automation logic controls, but scripting and API integration is still a very new experience.
 
Thread Starter
Joined
May 6, 2024
Messages
6
This looks like a great project! Unfortunately, the 3D printed turntable will be too small for most of my projects, but the concept and functionality with REW's API is definitely there.

Will you release your code to the public so others such as myself can learn from it? I've programmed plenty of building automation logic controls, but scripting and API integration is still a very new experience.

unidisco said:
Really awesome project- your post inspired me to start the build on this turntable. Would you be open to sharing your work on the Arduino coding for other people to harness this measurement power? Thanks so much.

I hope this can help you get started:
There are two parts:
- Arduino code
- REW-interface.

This is the arduino code:​

C++:
#define slpPin 4
#define dirPin 2
#define stepPin 3

#define clockwise 0x1
#define counterclockwise 0x0
#define stepsPerDeg 160
#define secPerRot 20
#define delay 20*17.36

const byte numChars = 32;
char alphaChar;
uint8_t dir;
char digitsChars[4];
int deg;
bool newData = false;

void setup() {
  Serial.begin(9600);
  Serial.println("<ttready>");
}

void loop() {
  recvSerialInput();
  onNewData();
}

void recvSerialInput() {
  static boolean recvInProgress = false;

  static byte iRd = 0;
  char startMarker = '<';
  char endMarker = '>';
  char rc;

  while (Serial.available() > 0 && newData == false) {
    rc = Serial.read();

    if (recvInProgress == true) {
      if (rc != endMarker) {
        switch (rc) {
          case 'a':
            dir = clockwise;
            break;
          case 'd':
            dir = counterclockwise;
            break;
          default:
            if (isDigit(rc)) {
              digitsChars[iRd] = rc;
              iRd++;
              if (iRd >= 3) {
                iRd = numChars - 1;
              }
            }
            break;
        }

      } else {
        digitsChars[iRd] = '\0';
        recvInProgress = false;

        iRd = 0;
        if (strlen(digitsChars) > 0) {
          deg = atoi(digitsChars);
        }
        newData = true;
      }
    }

    else if (rc == startMarker) {
      recvInProgress = true;
    }
  }
}

void onNewData() {
  if (newData == true) {

    Serial.print("Dir: ");
    Serial.println(dir);
    Serial.print("Deg: ");
    Serial.println(deg);

    deg = 0;
    newData = false;
  }
}

void turn(uint8_t dir, int deg) {
  digitalWrite(dirPin, dir);
  digitalWrite(slpPin, HIGH);

  for (int i = 0; i < deg * stepsPerDeg; i++) {
    // These four lines result in 1 step:
    digitalWrite(stepPin, HIGH);
    delayMicroseconds(delay);
    digitalWrite(stepPin, LOW);
    delayMicroseconds(delay);
  }
  digitalWrite(slpPin, LOW);
}

This code listens to serial commands on the given port.
The current format for a command is:
<daaass>
d = direction (1|2)
aaa = angle (001 - 999)
ss = speed ( seconds per revolution )

Example:
<101020>
10 degrees clockwise, at 20 secs. per revolution.

You can input this through a connected serial monitor, like in the Arduino IDE or vs code for manual control or with a control interface for automation.

The REW-interface​

This is a bit more complex for an audio focused forum but I will explain the concept. I implemented the interface in Go. It is a concurrent program that does three things:
1. Connect to serial port (for Arduino control)
2. Listen to the Measurement progress.
Registers a 'Measurement Subscription' on the REW API and listen for the measurement status communicated on this endpoint
2. Capture the rotational distance and transform this into the serial command accepted by the Arduino.
 
Last edited:
Top Bottom