


Description
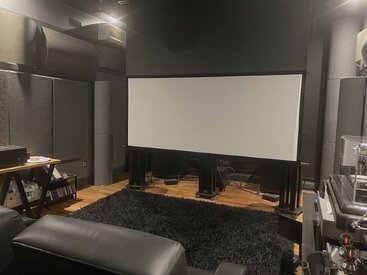
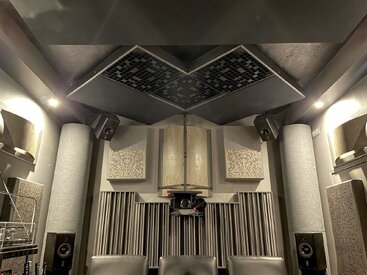
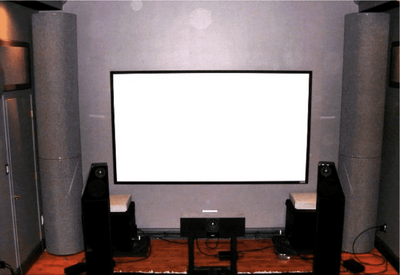
The "Stereo Room" V5, current day

Welcome to the current iteration of my big rig. Yes like most of us, there are other AV systems scattered about our household, but this one enjoys pride of place. It resides in the dedicated purpose-built "stereo room" I constructed nearly three decades ago.
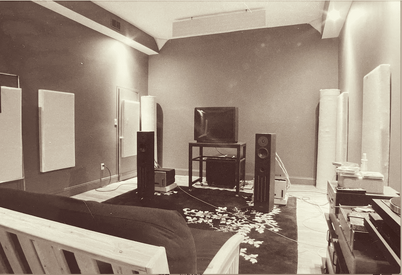
The "Stereo Room" V1, way back in 1997

The "Stereo Room" V3, in 2008

Back in 2008 when my wife and I decided we wanted to upgrade from a 60" plasma based modest HT in our living room to a real HT experience with a projector and big screen, we ran into a problem. Our 2nd floor loft conversion resides in a 100+ year old 3 story brick commercial building and the loft benefits from nearly 500 sq feet of huge windows front and rear. So there was no practical way to achieve total light control. The only room in our loft apartment with no windows was... my stereo room.
So all my sweet sounding, hot running Audio Research, Aesthetix, and Sonic Frontiers analog tube gear was out. Just my turntable and 4 Paradigm subwoofers would carry over into the new system. The stereo gear was replaced by a complete Meridian digital Music and Theater system that was purported to do right by legacy stereo media. Thus began an uneasy alliance between stereo and multi-channel...
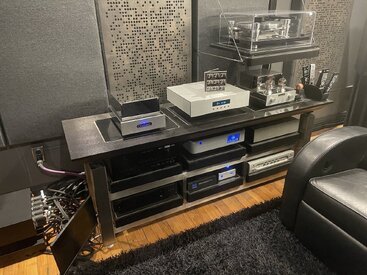
Back to the "Stereo Room" V5, current day
In a concerted effort to achieve what many "orthodox" audiophiles profess to be impossible- genuinely great 2 channel reproduction from a predominantly multi-channel system -I spent 12 years trying. And I failed. Mind you stereo digital sources were very good but I was simply not able to achieve satisfying two channel playback from vinyl. Even after I'd upgraded all the way up the Meridian food chain to their flagship 861pre-pro with the upgraded 24/96 ADC card and some of their best (former flagship) active DSP loudspeakers, vinyl playback was a disappointment.
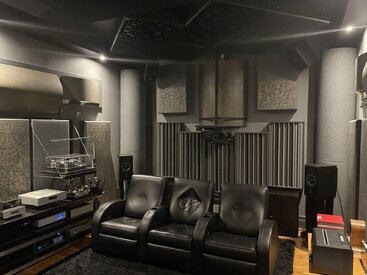
After years of trying and tinkering I finally went back to the drawing board in 2020. I had a new plan that should solve my vinyl replay complaints while also adding 4k cinema and Atmos to multi-channel. I chucked all that Meridian digital gear along with their DSP speakers. This time only my Oracle turntable, four Seaton subwoofers & the motorized projection screen would be retained. I arrived here in the pic above- Two totally independent source->pre-amplification->subwoofer x-over signal paths. The silver faceplates are stereo components while the black faceplates are multi-channel. These two separate front ends share only the front L & R active loudspeakers and the four subwoofers. A pair of clever pro audio 12v trigger actuated XLR switch boxes make moving between stereo and multi-channel as simple as powering on the Anthem pre-pro.
Today EVERYTHING SOUNDS AWESOME! I enjoy amazing vinyl and CD replay that is easily on par with the best iteration of my old mega-buck stereo-only all-tube rig along with jaw dropping Immersive audio. Hallelujah!
2 Channel front-end:
-Jay's Audio CDT2 Mk3 Transport
-hotrodded PS Audio Direct Stream DAC
-Oracle Delphi VI Reference/Turbo PS/Graham Phantom Supreme II/Benz LP-S turntable
-Coincident Statement Linestage
-Foundation Research V5 phono-stage
-JL Audio CR-1 electronic subwoofer crossover
Multi-Channel Audio front-end:
-OppoMod UDP-203 (SACD, DVD Audio, & BD Pure Audio)
-Anthem AVM60 pre-processor
-2x Meridian 557 power amps for Atmos overhead speakers
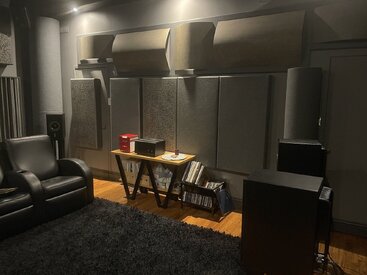
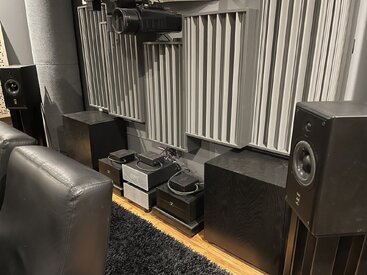
Loudspeakers:
-either 2x or 5x ATC SCM20 ASL Pro II active monitors on custom Skylan stands
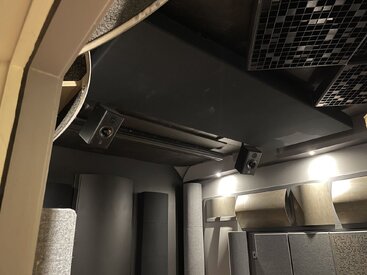
-4x ceiling mounted ATC SCM12i on K&M mounts for ATMOS/DTS-X media
-4x Seaton Submersive HP subwoofers, & a DSPeaker Anti-Mode 2.0 for subwoofer PEQ & front-to-rear time alignment
Video:
-OppoMod UDP-203
-Apple TV 4k
-JVC DLA 990 projector
-Isco 3L anamorphic lens on motorized sled
-105" Seymour-Screen Excellence EN4K acoustically transparent motorized 2.37:1 Superscope screen
Welcome to the current iteration of my big rig. Yes like most of us, there are other AV systems scattered about our household, but this one enjoys pride of place. It resides in the dedicated purpose-built "stereo room" I constructed nearly three decades ago.
The "Stereo Room" V1, way back in 1997
The "Stereo Room" V3, in 2008
Back in 2008 when my wife and I decided we wanted to upgrade from a 60" plasma based modest HT in our living room to a real HT experience with a projector and big screen, we ran into a problem. Our 2nd floor loft conversion resides in a 100+ year old 3 story brick commercial building and the loft benefits from nearly 500 sq feet of huge windows front and rear. So there was no practical way to achieve total light control. The only room in our loft apartment with no windows was... my stereo room.
So all my sweet sounding, hot running Audio Research, Aesthetix, and Sonic Frontiers analog tube gear was out. Just my turntable and 4 Paradigm subwoofers would carry over into the new system. The stereo gear was replaced by a complete Meridian digital Music and Theater system that was purported to do right by legacy stereo media. Thus began an uneasy alliance between stereo and multi-channel...
Back to the "Stereo Room" V5, current day
In a concerted effort to achieve what many "orthodox" audiophiles profess to be impossible- genuinely great 2 channel reproduction from a predominantly multi-channel system -I spent 12 years trying. And I failed. Mind you stereo digital sources were very good but I was simply not able to achieve satisfying two channel playback from vinyl. Even after I'd upgraded all the way up the Meridian food chain to their flagship 861pre-pro with the upgraded 24/96 ADC card and some of their best (former flagship) active DSP loudspeakers, vinyl playback was a disappointment.
After years of trying and tinkering I finally went back to the drawing board in 2020. I had a new plan that should solve my vinyl replay complaints while also adding 4k cinema and Atmos to multi-channel. I chucked all that Meridian digital gear along with their DSP speakers. This time only my Oracle turntable, four Seaton subwoofers & the motorized projection screen would be retained. I arrived here in the pic above- Two totally independent source->pre-amplification->subwoofer x-over signal paths. The silver faceplates are stereo components while the black faceplates are multi-channel. These two separate front ends share only the front L & R active loudspeakers and the four subwoofers. A pair of clever pro audio 12v trigger actuated XLR switch boxes make moving between stereo and multi-channel as simple as powering on the Anthem pre-pro.
Today EVERYTHING SOUNDS AWESOME! I enjoy amazing vinyl and CD replay that is easily on par with the best iteration of my old mega-buck stereo-only all-tube rig along with jaw dropping Immersive audio. Hallelujah!
2 Channel front-end:
-Jay's Audio CDT2 Mk3 Transport
-hotrodded PS Audio Direct Stream DAC
-Oracle Delphi VI Reference/Turbo PS/Graham Phantom Supreme II/Benz LP-S turntable
-Coincident Statement Linestage
-Foundation Research V5 phono-stage
-JL Audio CR-1 electronic subwoofer crossover
Multi-Channel Audio front-end:
-OppoMod UDP-203 (SACD, DVD Audio, & BD Pure Audio)
-Anthem AVM60 pre-processor
-2x Meridian 557 power amps for Atmos overhead speakers
Loudspeakers:
-either 2x or 5x ATC SCM20 ASL Pro II active monitors on custom Skylan stands
-4x ceiling mounted ATC SCM12i on K&M mounts for ATMOS/DTS-X media
-4x Seaton Submersive HP subwoofers, & a DSPeaker Anti-Mode 2.0 for subwoofer PEQ & front-to-rear time alignment
Video:
-OppoMod UDP-203
-Apple TV 4k
-JVC DLA 990 projector
-Isco 3L anamorphic lens on motorized sled
-105" Seymour-Screen Excellence EN4K acoustically transparent motorized 2.37:1 Superscope screen

